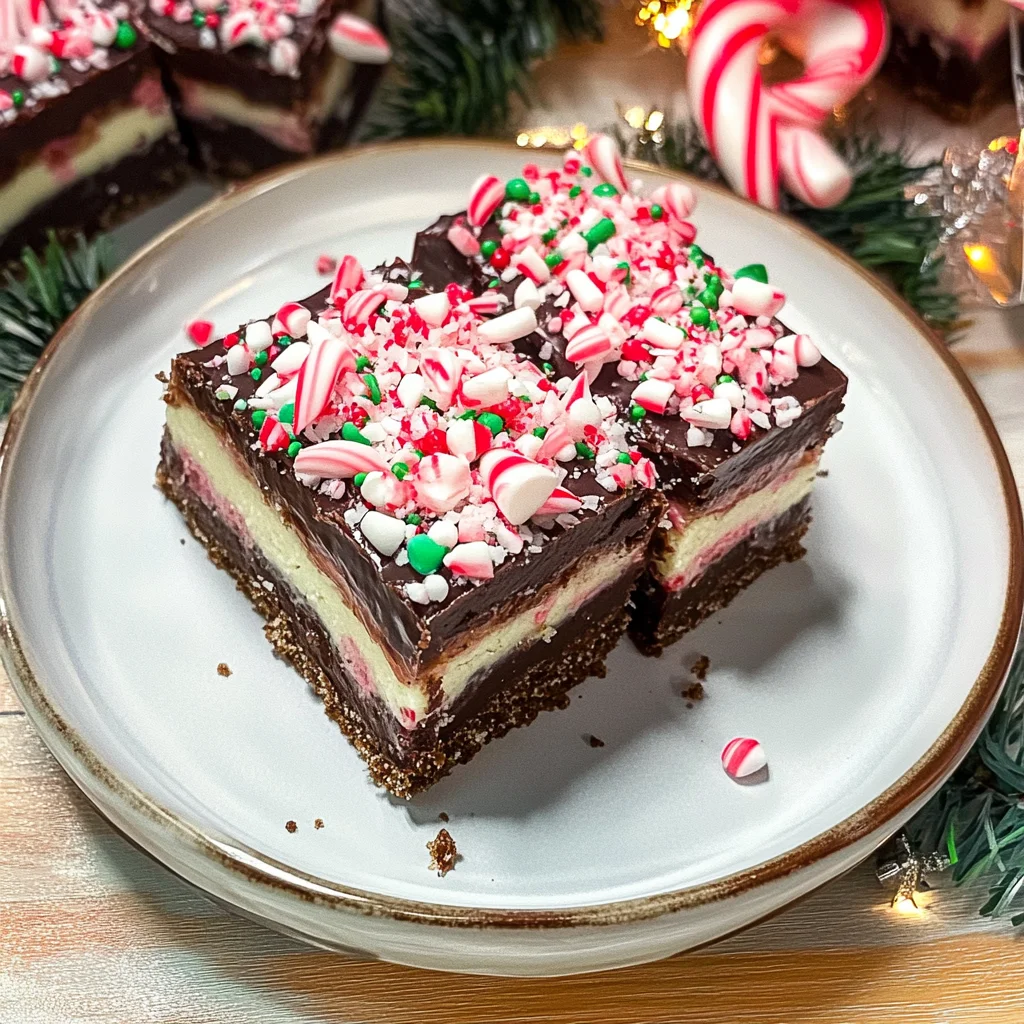
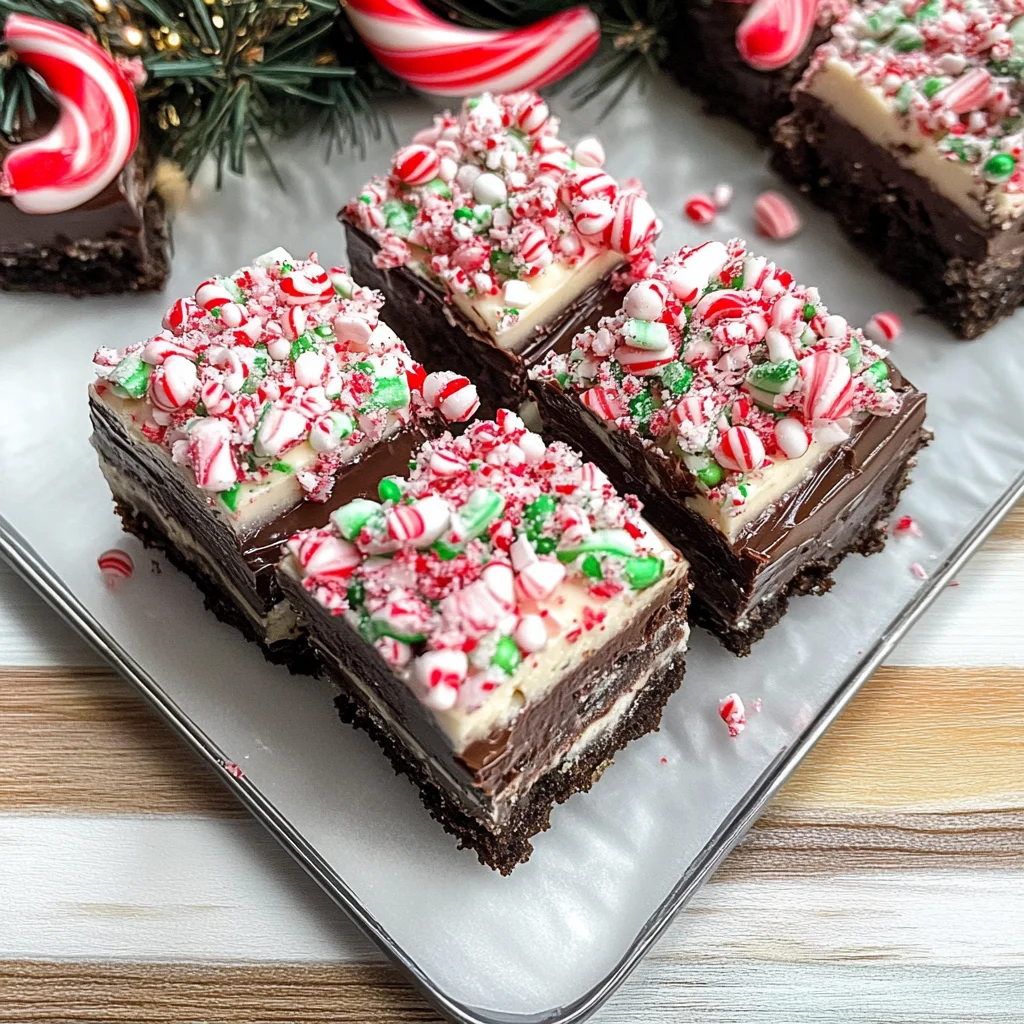
Peppermint Cheesecake Bars (Gluten-Free)
If you’re looking for the perfect holiday dessert that will bring smiles to faces and hearts, look no further than these Peppermint Cheesecake Bars (Gluten-Free). This recipe has been a favorite in my family for years, especially during the festive season. Not only are they deliciously creamy with a delightful peppermint kick, but they also look beautiful on any dessert table. These bars are a wonderful way to celebrate gatherings or simply indulge in a sweet treat after a long day.
What I love most about these Peppermint Cheesecake Bars (Gluten-Free) is their versatility. They can easily be made ahead of time, making them a stress-free option for those busy holiday weeks. Whether you’re sharing them with friends, family, or even just keeping them all to yourself, they’re sure to be a hit!
Why You’ll Love This Recipe
- Easy to Make: With just a few simple steps, you’ll have these delicious bars ready to go in no time.
- Family-Friendly: The combination of chocolate and peppermint appeals to both kids and adults alike!
- Make-Ahead Delight: Prepare them in advance and chill; they’re perfect for last-minute gatherings.
- Gluten-Free Option: Everyone can enjoy this treat without worrying about gluten.
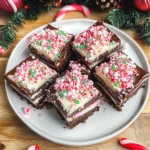
- Festive Presentation: Top them with crushed candy canes for a cheerful holiday touch!
Ingredients You’ll Need
Let’s talk about the ingredients! This recipe uses simple, wholesome items that you probably already have in your pantry. Gather these goodies, and you’ll be on your way to making some delightful Peppermint Cheesecake Bars (Gluten-Free):
- 4 oz. semi-sweet chocolate chips
- 1/2 c. butter, (softened)
- 2 c. sugar
- 3 eggs
- 2 tsp. vanilla extract
- 1 c. gluten-free all-purpose flour
- 8 oz. cream cheese, (softened)
- 2 TBSP. butter, (softened)
- 1 TBSP. cornstarch
- 14 oz. can sweetened condensed milk
- 2 tsp. peppermint extract
- 1 egg
- green food coloring, (optional)
- 1 c. semi-sweet chocolate chips
- 1/2 c. heavy whipping cream
- 1 TBSP. corn syrup
- crushed candy canes and sprinkles, (optional)
Variations
One of the best parts about this recipe is how flexible it is! Feel free to get creative with flavors and toppings:
- Swap the Chocolate: Use white chocolate instead of semi-sweet for a different twist.
- Add Different Extracts: If peppermint isn’t your thing, try vanilla or almond extract for a unique flavor.
- Make It Colorful: Use red or blue food coloring instead of green for fun festive colors.
- Top It Differently: Instead of candy canes, try drizzling with caramel sauce or adding nuts.
How to Make Peppermint Cheesecake Bars (Gluten-Free)
Step 1: Preheat Your Oven
Start by preheating your oven to 350° F. This ensures that your cheesecake bars bake evenly and perfectly from the start.
Step 2: Create the Bottom Layer
Melt the semi-sweet chocolate chips with butter until smooth. This chocolatey base adds richness to your bars and sets the tone for all those delightful flavors that follow.
Step 3: Mix It All Together
Combine the melted chocolate mixture with sugar, eggs, vanilla extract, and gluten-free flour using a hand mixer until everything is well blended. This step is crucial as it creates that lovely texture we love in cheesecake bars!
Step 4: Bake the First Layer
Spread your chocolate mixture into a greased 9 x 13 baking pan and bake for about 12 minutes. This gives it just enough time to set slightly before adding the creamy middle layer.
Step 5: Make the Middle Layer
In another bowl, cream together softened cream cheese, butter, and cornstarch until fluffy. Slowly add in sweetened condensed milk, peppermint extract, egg, and green food coloring if you want that festive flair! The fluffiness here is key; it makes the cheesecake layer light yet rich.
Step 6: Combine Layers
Pour this minty mixture over your baked bottom layer while it’s still hot – trust me; it helps meld those flavors beautifully together! Bake again for an additional 30 minutes or until firm.
Step 7: Prepare the Ganache
While your cheesecake bakes away, let’s whip up that luscious chocolate ganache! Melt together semi-sweet chocolate chips, heavy whipping cream, and corn syrup over low/medium heat while stirring constantly until smooth.
Step 8: Finish with Ganache
Once your cheesecake has baked perfectly, spread that smooth ganache generously over the top layer while it’s still warm. Don’t forget to add crushed candy canes and sprinkles for extra holiday cheer!
Step 9: Chill Out
Let it cool down at room temperature before chilling in the refrigerator until set – this could take about two hours but is oh-so worth it when you take that first bite!
Step 10: Cut & Serve
Once set, cut into bars – depending on how big you cut them; you’ll get about two to three dozen delicious servings! Enjoy sharing these Peppermint Cheesecake Bars (Gluten-Free) with loved ones or savoring them all by yourself!
Pro Tips for Making Peppermint Cheesecake Bars (Gluten-Free)
Making these Peppermint Cheesecake Bars is a delightful adventure, and with these pro tips, you’ll ensure they turn out perfectly every time!
-
Use room temperature ingredients – This helps achieve a smoother batter and creamier cheesecake layer, making your bars more enjoyable to eat.
-
Don’t overmix the layers – Mixing just until combined prevents incorporating too much air, which can cause your cheesecake to crack during baking.
-
Check for doneness – The middle layer should be set but still slightly jiggly in the center. It will firm up as it cools, ensuring a perfect texture.
-
Let cool completely before slicing – Allowing the bars to cool fully helps maintain their shape and makes cutting cleaner and easier.
-
Chill before serving – Chilling not only enhances the flavors but also ensures that the ganache sets properly, giving you that perfect chocolatey finish.
How to Serve Peppermint Cheesecake Bars (Gluten-Free)
Serving these Peppermint Cheesecake Bars can be just as fun as making them! With a few creative ideas, you can make them even more festive for holiday gatherings or special occasions.
Garnishes
-
Crushed candy canes – Sprinkling these on top adds a delightful crunch and intensifies the peppermint flavor.
-
Whipped coconut cream – A dollop of this dairy-free cream can add a light and airy element that complements the richness of the cheesecake.
Side Dishes
-
Fresh Fruit Salad – A colorful mix of seasonal fruits provides a refreshing contrast to the sweetness of the bars, balancing out your dessert table beautifully.
-
Minty Hot Chocolate – A cozy drink option that pairs well with the mint flavor of your cheesecake bars. Consider using non-dairy milk for a creamy texture without animal products.
-
Vanilla Ice Cream (Dairy-Free) – A scoop of this alongside your bars creates a classic dessert combo that’s sure to impress guests while keeping everything gluten-free.
These serving tips will elevate your Peppermint Cheesecake Bars experience, ensuring they’re not only delicious but also beautifully presented! Enjoy sharing this sweet treat with loved ones during the holiday season!
Make Ahead and Storage
These Peppermint Cheesecake Bars (Gluten-Free) are a fantastic option for meal prep. They can be made in advance, allowing you to enjoy their delightful flavors during the busy holiday season without the last-minute rush.
Storing Leftovers
- Allow the bars to cool completely before storing.
- Place them in an airtight container to keep them fresh.
- Store in the refrigerator for up to one week.
Freezing
- Cut the bars into portions before freezing for easy access.
- Wrap each bar individually in plastic wrap, then place them in a freezer-safe container or bag.
- Freeze for up to three months. Thaw in the refrigerator overnight before enjoying.
Reheating
- If you prefer your cheesecake bars warm, you can gently reheat them.
- Place a bar on a microwave-safe plate and microwave for 10-15 seconds.
- Check to ensure they are warmed through, being careful not to overheat.
FAQs
Got questions? Don’t worry! Here are some common queries about Peppermint Cheesecake Bars (Gluten-Free).
Can I use a different type of chocolate for Peppermint Cheesecake Bars (Gluten-Free)?
Absolutely! While semi-sweet chocolate is recommended for its rich flavor, you can experiment with dark chocolate or even white chocolate if you prefer. Just remember that it may alter the overall taste and sweetness of the bars.
How long do Peppermint Cheesecake Bars (Gluten-Free) need to chill?
After spreading the ganache on top, it’s best to chill the bars in the refrigerator for at least two hours or until fully set. This will ensure that they hold their shape when cut and served.
Can I omit the peppermint extract?
Yes, you can omit the peppermint extract if you’re not a fan of mint. The cheesecake bars will still be deliciously creamy and sweet without it!
Are these Peppermint Cheesecake Bars (Gluten-Free) suitable for gifting?
Definitely! These bars make lovely gifts during the holidays. Just package them nicely, and they’ll be a hit among family and friends!
Final Thoughts
I hope you enjoy making these delightful Peppermint Cheesecake Bars (Gluten-Free) as much as I do! They offer a perfect blend of creamy cheesecake and festive peppermint flavor that’s sure to bring joy. Whether you’re treating yourself or sharing with loved ones, these bars are a wonderful addition to any holiday table. Happy baking!
Peppermint Cheesecake Bars (Gluten-Free)
Indulge in the festive spirit with these delightful Peppermint Cheesecake Bars (Gluten-Free). This easy-to-make dessert combines a rich chocolate base with a creamy peppermint-infused cheesecake layer, topped with luscious chocolate ganache and vibrant crushed candy canes for the perfect holiday touch. Ideal for gatherings or cozy nights in, these bars are not only delicious but also gluten-free, making them a treat everyone can enjoy. Prepare them ahead of time to take the stress out of holiday baking, and watch as they become a favorite among family and friends!
- Prep Time: 20 minutes
- Cook Time: 42 minutes
- Total Time: 1 hour 2 minutes
- Yield: Approximately 24 servings 1x
- Category: Dessert
- Method: Baking
- Cuisine: American
Ingredients
- 4 oz. semi-sweet chocolate chips
- 1/2 c. butter (softened)
- 2 c. sugar
- 3 eggs
- 2 tsp. vanilla extract
- 1 c. gluten-free all-purpose flour
- 8 oz. cream cheese (softened)
- 14 oz. sweetened condensed milk
- 2 tsp. peppermint extract
- 1 c. semi-sweet chocolate chips (for ganache)
- 1/2 c. heavy whipping cream
- Crushed candy canes (for garnish)
Instructions
- Preheat your oven to 350°F.
- Melt chocolate chips with softened butter until smooth to create the bottom layer.
- Mix melted chocolate with sugar, eggs, vanilla, and gluten-free flour until well combined.
- Spread the mixture into a greased 9 x 13" baking pan and bake for 12 minutes.
- In another bowl, beat cream cheese, butter, and cornstarch until fluffy; then add sweetened condensed milk, peppermint extract, egg, and green food coloring if desired.
- Pour the cheesecake mixture over the baked layer and bake again for about 30 minutes or until set.
- For the ganache, melt semi-sweet chocolate chips with heavy cream and corn syrup until smooth; spread over cooled cheesecake.
- Chill for at least two hours before cutting into bars.
Nutrition
- Serving Size: 1 serving
- Calories: 220
- Sugar: 18g
- Sodium: 95mg
- Fat: 12g
- Saturated Fat: 7g
- Unsaturated Fat: 4g
- Trans Fat: 0g
- Carbohydrates: 24g
- Fiber: 1g
- Protein: 3g
- Cholesterol: 55mg