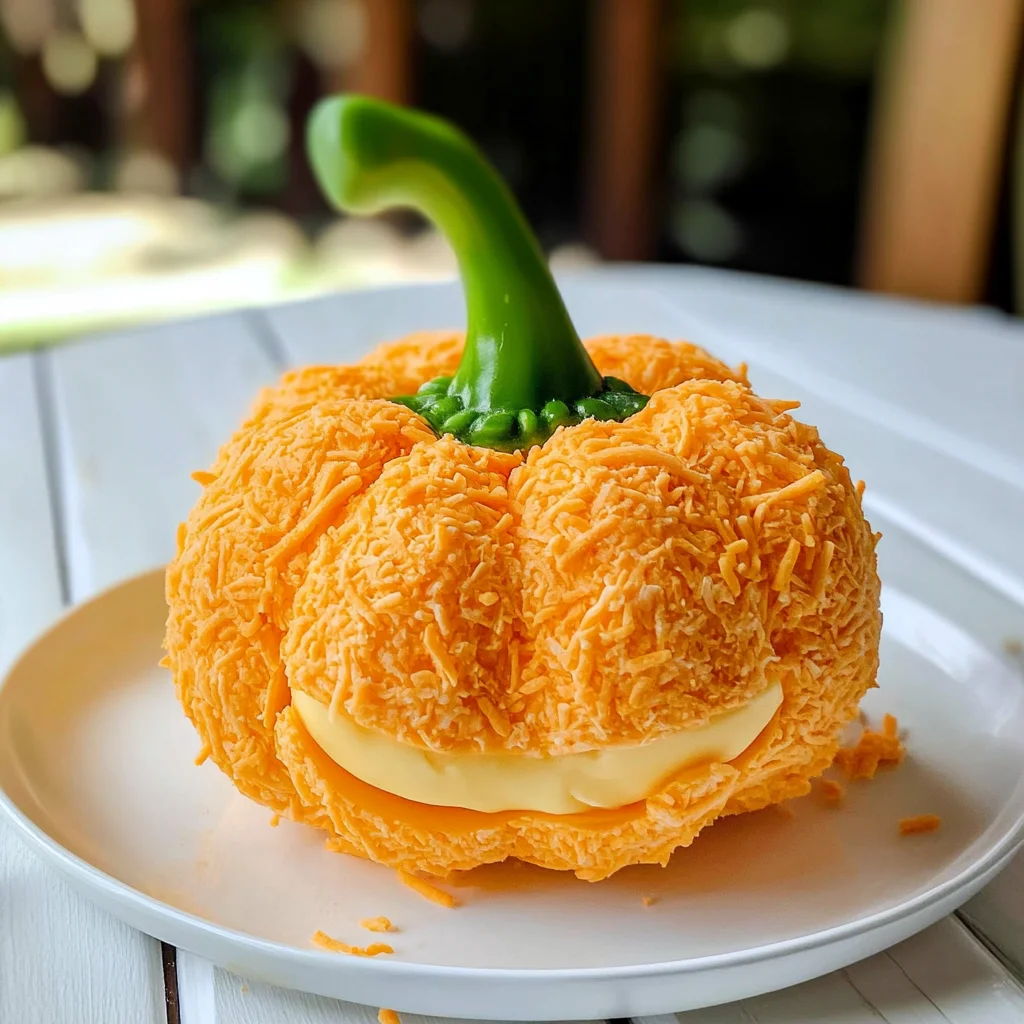
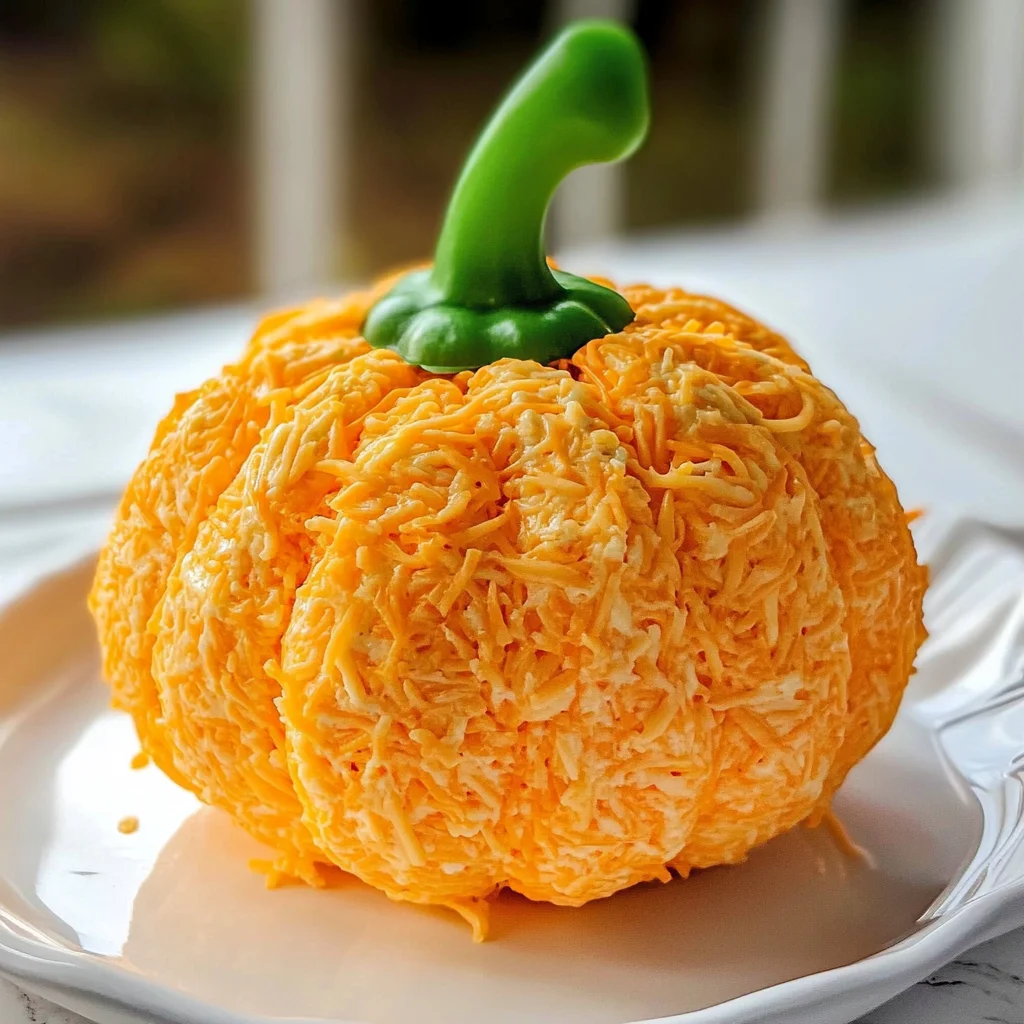
Pumpkin Shaped Cheese Ball
If you’re looking for a fun and delicious appetizer that’s perfect for any gathering, you’ve come to the right place! This Pumpkin Shaped Cheese Ball is not only a delightful treat for your taste buds but also a feast for the eyes. Imagine bringing this festive cheese ball to your next family gathering or casual game night; it’s sure to be the star of the snack table. Plus, it’s incredibly simple to make, which is always a win in my book!
This recipe has been passed down in my family, and every time I make it, I’m reminded of cozy autumn gatherings and laughter shared over good food. Whether you’re hosting friends or just looking for a comforting snack on a busy weeknight, this cheese ball will fit right in.
Why You’ll Love This Recipe
- Quick to prepare: With just 15 minutes of prep time, you can whip up this tasty treat without any hassle.
- Family-friendly: Kids and adults alike will love digging into this creamy, cheesy delight!
- Make ahead: Prepare it in advance and let it chill in the fridge until you’re ready to serve.
- Festive flair: Its pumpkin shape makes it perfect for fall gatherings or Halloween parties.
- Customizable: Feel free to add your favorite ingredients or spices to make it uniquely yours!
Ingredients You’ll Need
Let’s gather our simple, wholesome ingredients for this delightful Pumpkin Shaped Cheese Ball! You likely have most of these items already in your pantry or fridge.
For the Cheese Mixture
- 16 ounces cream cheese
- 2 cups shredded cheddar cheese
- 2 tbsp. ranch seasoning
- 3 green onions (sliced)
- Salt and pepper (to taste)
For the Decoration
- 1 bell pepper stem
- Twine or rubber bands (to make more of a pumpkin shape)
Variations
This recipe is quite flexible, allowing you to get creative with flavors! Here are some fun ideas to mix things up:
- Add herbs: Toss in some fresh chopped herbs like chives or parsley for an extra burst of flavor.
- Spice it up: If you’re feeling adventurous, add diced jalapeños or red pepper flakes for some heat.
- Change the cheese: Swap out cheddar for another cheese like gouda or pepper jack for a unique twist.
- Include nuts: Fold in some chopped pecans or walnuts for added crunch and flavor.
How to Make Pumpkin Shaped Cheese Ball
Step 1: Soften the Cream Cheese
Start by spreading the cream cheese into a medium mixing bowl. Soften it well; this makes mixing easier and helps blend all the flavors together seamlessly.
Step 2: Mix It Up
Now it’s time to stir! Add 1 cup of shredded cheddar cheese, 2 tablespoons of ranch seasoning mix, and the sliced green onions. Season with salt and pepper to your liking. The ranch seasoning adds a lovely flavor that pairs perfectly with the creamy cheeses.
Step 3: Form Your Cheese Ball
Once everything is well combined, shape the mixture into a ball using your hands. This part is super fun; don’t be afraid to get your hands messy!
Step 4: Coat with Cheese
Lay out a piece of plastic wrap on your countertop. Sprinkle some shredded cheese onto it for the base. Then, firmly press more shredded cheese into the sides of your ball until it’s fully coated. This gives it that delicious cheesy exterior!
Step 5: Wrap It Up
Wrap the cheeseball tightly in plastic wrap after coating. This step is essential because it keeps everything in place while chilling in the fridge.
Step 6: Create Your Pumpkin Shape
For that adorable pumpkin look, use baker’s twine to tie three strands around your cheeseball. It adds that special touch that makes it really stand out at gatherings!
Step 7: Add the Finishing Touch
Before serving, place a bell pepper stem on top as a charming decoration. It brings everything together beautifully and makes your cheeseball look even more festive!
Now you’re ready to enjoy this delightful Pumpkin Shaped Cheese Ball at your next gathering—everyone will love digging into this creamy treat!
Pro Tips for Making Pumpkin Shaped Cheese Ball
Creating the perfect Pumpkin Shaped Cheese Ball is easier than you think! With a few handy tips, you can impress your guests and make this dish a delightful centerpiece.
-
Choose Quality Ingredients: Opt for high-quality cream cheese and cheddar to enhance the flavor of your cheese ball. Fresh ingredients always yield better taste!
-
Customize Seasoning: Feel free to experiment with different seasonings or herbs in addition to ranch. This allows you to tailor the flavor profile to suit your palate or theme.
-
Chill Time Matters: Allowing the cheese ball to chill in the refrigerator for several hours (or overnight) helps it set properly and enhances the flavors as they meld together.
-
Use Fresh Vegetables: Instead of just using crackers, serve with colorful fresh veggies like bell peppers, celery sticks, or cucumber slices. They add crunch and freshness that balance the richness of the cheese.
-
Make It Ahead: Prepare your cheese ball a day in advance. This not only saves time but also allows the flavors to develop further, making it even more delicious when served!
How to Serve Pumpkin Shaped Cheese Ball
Presenting your Pumpkin Shaped Cheese Ball can be just as fun as making it! Here are some creative ways to serve this festive app.
Garnishes
- Fresh Herbs: A sprinkle of chopped parsley or chives adds a pop of color and freshness that brightens up the dish.
- Olive Oil Drizzle: A light drizzle of olive oil over the cheeseball before serving lends a touch of richness and enhances its appeal.
Side Dishes
-
Crackers: A variety of crackers—like whole grain, gluten-free, or herb-infused—provide a lovely crunch that complements the creamy texture of the cheese ball.
-
Veggie Platter: Create a colorful platter with fresh vegetables such as carrot sticks, cherry tomatoes, and bell pepper slices for dipping. These add a nutritious element alongside your cheesy treat.
-
Fruit Skewers: Pair with sweet fruit skewers featuring grapes, apple slices, or strawberries for a refreshing contrast that balances out savory flavors beautifully.
-
Breadsticks: Offer some crunchy breadsticks as an alternative vehicle for enjoying the cheese ball. Their crispiness makes them an excellent pairing!
Embrace these serving suggestions, and watch how your Pumpkin Shaped Cheese Ball becomes the star attraction at any gathering!
Make Ahead and Storage
This Pumpkin Shaped Cheese Ball is perfect for meal prep! You can make it ahead of time, which allows the flavors to meld beautifully. Here’s how to store and preserve this delightful appetizer.
Storing Leftovers
- Wrap unused portions tightly in plastic wrap or transfer to an airtight container.
- Store in the refrigerator for up to 3-5 days.
- Remember to keep it covered to maintain freshness and prevent it from absorbing odors.
Freezing
- This cheese ball can be frozen if you want to prepare it well in advance.
- Wrap it tightly in plastic wrap, then place it in a freezer-safe container or bag.
- It can be frozen for up to 2 months; just make sure to label the container with the date.
Reheating
- There’s no need to reheat this cheese ball; it’s best served cold!
- Simply remove it from the freezer and let it thaw in the refrigerator overnight before serving.
FAQs
If you’re wondering more about this delicious recipe, here are some common questions!
Can I customize my Pumpkin Shaped Cheese Ball?
Absolutely! Feel free to add your favorite herbs, spices, or additional ingredients like diced bell peppers or different types of cheese to make it uniquely yours.
How do I serve my Pumpkin Shaped Cheese Ball?
Serve your Pumpkin Shaped Cheese Ball with crackers, fresh vegetables, or even breadsticks for a delightful appetizer that everyone will love!
Is the Pumpkin Shaped Cheese Ball gluten-free?
Yes, as long as you serve it with gluten-free crackers or vegetables, this recipe is a great gluten-free option!
Final Thoughts
I hope you enjoy making this charming Pumpkin Shaped Cheese Ball as much as I do! It’s not only a fun addition to any gathering but also a delicious way to bring people together. Your friends and family will surely appreciate your culinary creativity. Happy cooking, and don’t forget to share your lovely creations!
Pumpkin Shaped Cheese Ball
Indulge in the spirit of autumn with this delightful Pumpkin Shaped Cheese Ball, a perfect centerpiece for your gatherings. This creamy, savory appetizer combines rich cream cheese and sharp cheddar to create a treat that’s as pleasing to the eyes as it is to the palate. Shaped like a pumpkin and adorned with a bell pepper stem, it adds a festive flair to any table. With just 15 minutes of preparation time, you can whip up this crowd-pleaser that both kids and adults will adore. Customize it with your favorite herbs or spices, and serve it alongside fresh veggies or crackers for a well-rounded snack that celebrates the season.
- Prep Time: 15 minutes
- Cook Time: 0 minutes
- Total Time: 15 minutes
- Yield: Serves approximately 12 people 1x
- Category: Appetizer
- Method: No-cook
- Cuisine: American
Ingredients
- 16 ounces cream cheese
- 2 cups shredded cheddar cheese
- 2 tablespoons ranch seasoning
- 3 green onions (sliced)
- Salt and pepper (to taste)
- Bell pepper stem for decoration
Instructions
- Soften cream cheese in a mixing bowl.
- Stir in cheddar cheese, ranch seasoning, green onions, salt, and pepper until combined.
- Shape mixture into a ball using your hands.
- Coat with additional shredded cheese by pressing it onto the surface.
- Wrap tightly in plastic wrap and chill in the fridge.
- When ready to serve, tie baker's twine around the cheeseball to form a pumpkin shape and place a bell pepper stem on top.
Nutrition
- Serving Size: 1/12 of cheese ball (approximately 60g)
- Calories: 145
- Sugar: 1g
- Sodium: 280mg
- Fat: 11g
- Saturated Fat: 6g
- Unsaturated Fat: 5g
- Trans Fat: 0g
- Carbohydrates: 3g
- Fiber: 0g
- Protein: 7g
- Cholesterol: 35mg