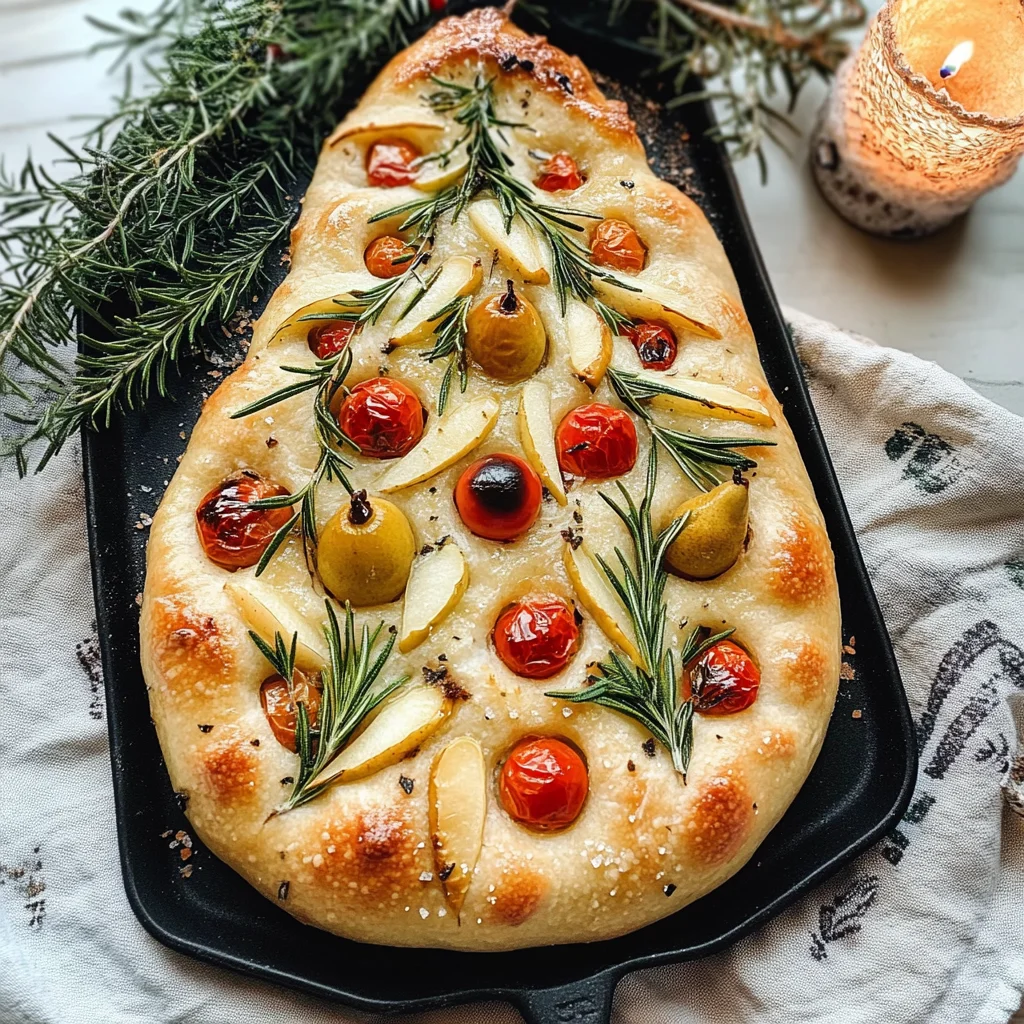
Christmas Tree Focaccia
If you’re looking for a fun and festive way to bring some cheer to your holiday table, look no further than this delightful Christmas Tree Focaccia! This recipe has become a beloved tradition in my home, as it not only tastes amazing but also serves as a beautiful centerpiece for gatherings. Whether it’s a busy weeknight or a cozy family gathering, this focaccia is sure to impress everyone.
The best part? It’s super easy to make, and the kids can even help with the decorating! Each bite of this fluffy bread filled with colorful toppings is like a warm hug on a chilly day. You can serve it alongside your favorite soups or enjoy it on its own as a snack. Let’s dive into why you’ll love making this Christmas Tree Focaccia!
Why You’ll Love This Recipe
- Easy Preparation: With just a few simple steps, you’ll have a stunning focaccia that looks like you spent all day baking.
- Family-Friendly Fun: Involve the little ones in creating their own edible trees; they will love arranging the toppings!
- Make-Ahead Convenience: The dough can be prepared the night before, making mealtime stress-free.
- Delicious Flavor: The combination of fresh ingredients and olive oil creates a crispy crust and soft interior that everyone will adore.

Ingredients You’ll Need
Let’s gather some simple, wholesome ingredients to craft our Christmas Tree Focaccia. You might already have many of these items in your kitchen!
For the Dough
- 3 cups bread flour
- 1/4 tsp active dry yeast
- 1 1/4 tsp coarse salt
- 1 2/3 cup warm water
For the Toppings
- Pear, sliced thinly
- Pearl onions, halved
- Cherry tomatoes, sliced in half
- Thinly sliced red onion
- Fresh rosemary sprigs
- Coarse salt for sprinkling
- Plenty of olive oil (a few tablespoons)
Variations
This recipe is wonderfully flexible! Feel free to get creative with your toppings based on what you have on hand or what your family loves.
- Swap the Pear: Use apples or even figs for a different flavor profile.
- Add More Veggies: Bell peppers or olives would make great additions to your tree decorations.
- Experiment with Spices: Sprinkle in some garlic powder or Italian herbs for an extra kick of flavor.
- Try Different Cheeses: Crumbled feta or dairy-free cheese can add creaminess and depth.
How to Make Christmas Tree Focaccia
Step 1: Prepare the Dough
In a large mixing bowl, combine the flour, yeast, and coarse salt. Whisk until well combined. Then add in the warm water and stir with a wooden spoon until the mixture becomes shaggy and wet. Cover it up with plastic wrap and let it rest overnight on your counter—this slow rise allows for amazing flavor development!
Step 2: Shape and Rest the Dough
The next day, grab your casserole dish (around 7×12 inches works great) and generously drizzle olive oil at the bottom. Uncover your dough; it should look risen and bubbly. Gently tip it out into the dish and spread it out using your hands so it fits snugly. Dimple the surface with your fingers before drizzling more olive oil over top. Let it rest again for two hours; this step ensures that lovely airy texture.
Step 3: Preheat Your Oven
Preheat your oven to 400°F (200°C). This way, once we finish decorating our dough, it will be ready to bake immediately!
Step 4: Decorate Your Focaccia Tree
Now comes the fun part—decorating! Use rosemary sprigs as tree branches fanned out beautifully across the dough. Slice some pear for the base of your tree. Halve cherry tomatoes and pearl onions to create ornaments that pop with color. Don’t forget about adding some sliced pear on top as a festive star! Get creative—there’s no wrong way to build your edible masterpiece.
Step 5: Bake Your Creation
Once you’re satisfied with how your tree looks, sprinkle lightly with coarse salt. Pop it into the oven for about 25 minutes until puffed up and golden brown. The aroma will fill your kitchen with warmth!
Step 6: Slice and Serve
Allow your Christmas Tree Focaccia to cool for a few minutes before slicing. Serve warm and watch as everyone gathers around this gorgeous centerpiece!
And there you have it—a charming addition to any holiday table that’s sure to delight family and friends alike!
Pro Tips for Making Christmas Tree Focaccia
Making your Christmas Tree Focaccia can be a delightful experience, and these pro tips will help you achieve the best results!
-
Use Fresh Ingredients: Opt for fresh herbs and vegetables when decorating your focaccia. Fresh ingredients not only enhance flavor but also add vibrant colors that make your focaccia visually appealing.
-
Experiment with Shapes: Don’t hesitate to get creative with the arrangement of your toppings. The more unique the shapes, the more festive your tree will look! Try using different sizes and orientations for an eye-catching design.
-
Oil Generously: Drizzling olive oil both before and after baking ensures a crispy crust and adds richness to the bread. It also helps to keep the toppings from drying out during baking.
-
Let It Rise: Patience is key! Allowing the dough to rise overnight develops deeper flavors and gives you that lovely airy texture which is essential for great focaccia.
-
Stay Mindful of Baking Time: Keep an eye on your focaccia while it bakes. Ovens can vary, and you want to catch it just as it turns golden brown to maintain that perfect puffiness.
How to Serve Christmas Tree Focaccia
Presenting your Christmas Tree Focaccia beautifully will impress your guests and make any gathering feel special. Here are some ideas to elevate your serving style!
Garnishes
- Fresh Herbs: A sprinkle of extra rosemary or even some thyme can enhance both flavor and presentation.
- Balsamic Glaze: A drizzle of balsamic glaze adds a tangy sweetness that complements the savory flavors beautifully.
- Chili Flakes: For those who enjoy a bit of heat, sprinkle chili flakes on top just before serving for an exciting kick.
Side Dishes
- Mixed Green Salad: A light salad with mixed greens, cherry tomatoes, and a lemon vinaigrette provides a refreshing contrast to the hearty focaccia.
- Roasted Vegetables: Seasonal roasted veggies like carrots, zucchini, and bell peppers bring in additional flavors while being healthy and colorful.
- Hummus Platter: Pairing with a variety of hummus flavors (like roasted red pepper or garlic) allows for a fun dipping experience alongside the focaccia.
- Cheese Board: A selection of plant-based cheeses can complement the focaccia nicely, providing creamy textures that balance out its crunchiness.
With these tips and serving suggestions, your Christmas Tree Focaccia will not only taste amazing but also look stunning on any holiday table!
Make Ahead and Storage
This Christmas Tree Focaccia is a delightful dish that’s perfect for meal prep or festive gatherings. Its unique presentation makes it not only delicious but also visually appealing, ensuring your efforts won’t go unnoticed! Here’s how you can store it to keep it fresh for later enjoyment.
Storing Leftovers
- Allow the focaccia to cool completely before storing.
- Wrap the focaccia in plastic wrap or aluminum foil to prevent it from drying out.
- Store it in an airtight container at room temperature for up to 2 days.
Freezing
- Slice the focaccia into portions.
- Wrap each slice tightly in plastic wrap, then place them in a freezer-safe bag.
- Label and date the bag; it can be frozen for up to 3 months.
Reheating
- Preheat your oven to 350°F (175°C).
- Unwrap the focaccia and place it directly on the oven rack or a baking sheet.
- Heat for about 10-15 minutes until warmed through and slightly crispy.
FAQs
Here are some common questions about making Christmas Tree Focaccia!
Can I use other toppings for my Christmas Tree Focaccia?
Absolutely! Feel free to get creative with toppings—think bell peppers, olives, or even nuts. Just ensure they complement the flavors of your focaccia.
How long does Christmas Tree Focaccia last?
When stored properly, this festive bread will remain fresh for about 2 days at room temperature. If you freeze it, you can enjoy it up to 3 months later!
What is the best way to decorate my Christmas Tree Focaccia?
Let your imagination run wild! Use rosemary sprigs as branches, cherry tomatoes as ornaments, and sliced pears as a tree topper. The key is to have fun with it!
Can I make Christmas Tree Focaccia ahead of time?
Yes! You can prepare the dough a day before and let it rise overnight. Decorate and bake just before serving for maximum freshness.
Final Thoughts
I hope you’re as excited as I am to make this beautiful Christmas Tree Focaccia! It’s a wonderful way to bring some holiday spirit into your kitchen while enjoying delicious flavors with family and friends. Have fun decorating this unique bread, and don’t hesitate to share your creations with loved ones. Happy baking!
Christmas Tree Focaccia

Looking to add a festive touch to your holiday gatherings? This Christmas Tree Focaccia is the perfect centerpiece! With its delightful shape and colorful toppings, this recipe not only looks stunning but also provides a warm, comforting flavor that everyone will love. Easy enough for kids to help with, this focaccia invites creativity in both preparation and decoration. Pair it with soups or enjoy as a snack; it’s bound to be a hit at any festive occasion!
- Prep Time: 15 minutes
- Cook Time: 25 minutes
- Total Time: 40 minutes
- Yield: Serves 8
- Category: Bread
- Method: Baking
- Cuisine: Italian
Ingredients
- 3 cups bread flour
- 1/4 tsp active dry yeast
- 1 1/4 tsp coarse salt
- 1 2/3 cup warm water
- Pear, sliced thinly
- Pearl onions, halved
- Cherry tomatoes, sliced in half
- Fresh rosemary sprigs
- Olive oil for drizzling
Instructions
- Prepare the Dough: In a large bowl, whisk together flour, yeast, and salt. Add warm water and stir until shaggy. Cover and let rise overnight.
- Shape and Rest: Drizzle olive oil in a casserole dish. Gently transfer the dough into the dish and spread it out. Dimple the surface and drizzle with more olive oil. Let it rest for 2 hours.
- Preheat Oven: Preheat your oven to 400°F (200°C).
- Decorate: Use rosemary sprigs as branches and arrange sliced pear, cherry tomatoes, and pearl onions as ornaments on the dough.
- Bake: Sprinkle with coarse salt and bake for about 25 minutes until golden brown.
- Serve: Allow to cool slightly before slicing and serving.
Nutrition
- Serving Size: 1 piece (100g)
- Calories: 230
- Sugar: 2g
- Sodium: 320mg
- Fat: 4g
- Saturated Fat: 0g
- Unsaturated Fat: 3g
- Trans Fat: 0g
- Carbohydrates: 44g
- Fiber: 2g
- Protein: 7g
- Cholesterol: 0mg